Archive
Consolidating Form Responses
In my previous post I covered how to use Word 2010 to create forms. Hopefully you can now get lots of people to fill in the form with the required information and return it to you. The problem now is that you have a number of forms and are faced with the challenge of extracting all the information into one place.
Breaking that challenge down into some simple steps we have:
- Specify the folder containing all the returned forms
- Loop through all the files in the folder
- For each file loop through all the content controls
- For each content control extract the value and add it to a report string
- Write the report string to a text file
1 Specify the folder
With thanks to Greg Maxey for the Tally Data code.
While it would be possible to include all the code into one macro in this case I have split some of the functions and routines into separate chunks. So here is a function pick a folder containing the files to analyse.
Function GetPathToUse() As Variant
' Call this function from another sub to populate a variable with a path to a folder
Dim fDialog As FileDialog
  Set fDialog = Application.FileDialog(msoFileDialogFolderPicker)
  With fDialog
    .Title = "Select Folder containing the completed form documents to and click OK"
    .AllowMultiSelect = False
    .InitialView = msoFileDialogViewList
    If .Show <> -1 Then
      GetPathToUse = ""
      Set fDialog = Nothing
      Exit Function
    End If
    GetPathToUse = fDialog.SelectedItems.Item(1)
    If Right(GetPathToUse, 1) <> "\" Then GetPathToUse = GetPathToUse + "\"
  End With
lbl_Exit:
  Exit Function
End Function
This function can be called from the main routine:
Dim MyPath As String

MyPath = GetPathToUse

  If MyPath = "" Then
    MsgBox "A folder was not selected"
    Exit Sub
  End If
2 Loop through all the files in the folder
For the folder specified in the first step we need to loop through all the files in that folder and write those names into an array.
  oFileName = Dir$(MyPath & "*.docx")
  ReDim FileArray(1 To 10000) 'User a number larger the expected number of files to process
  'Add file name to the array
  Do While oFileName <> ""
    i = i + 1
    FileArray(i) = oFileName
    'Get the next file name
    oFileName = Dir$
  Loop
  If i = 0 Then
    MsgBox "The selected folder did not contain any forms to process."
    Exit Sub
  End If
    'Resize and preserve the array
  ReDim Preserve FileArray(1 To i)
3 Loop through content controls
For each file lets loop through all the content controls and write the values to a text string.
  For x = 1 To i
  'MsgBox (x & " " & MyPath & FileArray(x))
  Documents.Open (MyPath & FileArray(x))
 ' MsgBox (FileArray(x) & " open")
  ' for each file extract the field bvalues
'write the values to a text file
  iCC = ActiveDocument.ContentControls.Count
  For c = 1 To iCC
  MyString = MyString & " " & ActiveDocument.ContentControls(c).Range & ", "
  Next c

  ActiveDocument.Close
  MyString = MyString & vbCrLf

  Next x
4 Write the string to a text file
This also uses a couple of separate routines.
Sub WriteStringToFile(pFileName As String, pString As String)

    Dim intFileNum As Integer

    intFileNum = FreeFile
                ' change Output to Append if you want to add to an existing file
                ' rather than creating a new file each time
    Open pFileName For Output As intFileNum
    Print #intFileNum, pString
    Close intFileNum

End Sub
Bringing it all together
Combining all of the above steps into one macro gives the following.
Sub ConsolidateForms()
' Specify a folder
' identify all the files in the folder
' loop through all the files
' for each file extract the field bvalues
'write the values to a text file

Dim MyPath As String
Dim oFileName As String
Dim FileArray()
Dim i As Integer, x As Integer, c As Integer
Dim MyString As String
'MyString = "Title, First, Last, Address1, Address2, Town, County, PostCode, Email, Phone"
MyString = ""
Dim iCC As Integer

MyPath = GetPathToUse

  If MyPath = "" Then
    MsgBox "A folder was not selected"
    Exit Sub
  End If

  Application.ScreenUpdating = False
  'Identify files names
  oFileName = Dir$(MyPath & "*.docx")
  ReDim FileArray(1 To 10000) 'User a number larger the expected number of files to process
  'Add file name to the array
  Do While oFileName <> ""
    i = i + 1
    FileArray(i) = oFileName
    'Get the next file name
    oFileName = Dir$
  Loop
  If i = 0 Then
    MsgBox "The selected folder did not contain any forms to process."
    Exit Sub
  End If
    'Resize and preserve the array
  ReDim Preserve FileArray(1 To i)

  '***
  For x = 1 To i
  'MsgBox (x & " " & MyPath & FileArray(x))
  Documents.Open (MyPath & FileArray(x))
 ' MsgBox (FileArray(x) & " open")
  ' for each file extract the field bvalues
'write the values to a text file
  iCC = ActiveDocument.ContentControls.Count
  For c = 1 To iCC
  MyString = MyString & " " & ActiveDocument.ContentControls(c).Range & ", "
  Next c

  ActiveDocument.Close
  MyString = MyString & vbCrLf

  Next x
  '***
      Dim strTestFile As String
    strTestFile = MyPath & "ccReport.TXT"    ' be sure you have a C:\TEMP folder or it won't work

    ' Write it to a file
    Call WriteStringToFile(strTestFile, MyString)

Application.ScreenUpdating = True

End Sub
Creating Forms in Word
The challenges of using a form
We all use forms that have been created by others in Microsoft Word, and we may want to create forms ourselves, for others to fill in. When I find myself in the first group I hate it when people have used lots of underscores to create an area for me to enter information. As soon as you type into it the underscores get pushed out and the whole thing starts to look a mess.

The other thing I hate is when someone has created a table for the form but then locked the row height of the table, so if you enter more text than can fit on a row the additional text gets hidden.
The challenges of creating a form
This post is going to focus on how to create better forms. Obviously we want to avoid the above two issues for people using our forms, but there are two more major factors to consider:
- Locking the form – If I create a form for people to fill out then I don’t want them to be able to change the layout of the form or add or delete content. I only want them to enter information in the areas that I want them to.
- Collecting the data – Having got people to fill in my form and return it to me I would really like to be able to capture the data without having to do endless re-keying or copying and pasting
Creating Forms
The key to creating forms in Word 2007 and 2010 is to use Content Controls in conjunction with tables to create an easy to use layout.
Developer Tab
In order to use Content Controls you need to be able to access the Developer Tab of the Ribbon. This is not visible by default. To make it visible:
- Click the File tab.
- Click Options.
- Click Customize Ribbon.
- Under Customize the Ribbon, click Main Tabs.
- In the list, select the Developer check box, and then click OK.
- Use separate cells for instructions and responses
- Use a new row for each new piece of information
Creating the structure
The simplest way of creating the structure for the form is through the use of tables. On the whole I tend to follow these guidelines:
(The only exceptions to the latter are where you are collecting title and sex information, both of which can be stored on one line).
So, if I was creating a form to capture some personal information I might start with a table structure like this:

Content Controls
Now we are going to add the Content Controls. These will be the only areas of the form that the users will be able to edit. The rest of the form will be locked and protected.
Since we want to be able to extract data from forms we will change the properties of the controls that we add so that we can refer to a specific control.
To add a control
- Select the cell on the table where the content should be inserted
- Click on the Developer tab from the ribbon
- In the Controls group click Design Mode to turn on Design mode
- Select the required control
Text boxes
To insert a text box
- Click on a text option

- A control will be inserted into the table

- Click on the Properties button from the Controls group. A dialogue box will appear

- Enter a Title. This will appear above the field to help users enter the correct information
- Enter a Tag. This is what we can use to programmatically refer to this control
- Check the box to stop it being deleted

- Click OK


Drop Down Lists
To insert a Combo Box or Drop Down List:
- Click on the required control
- Click on the Properties button to display a dialogue box

- As with the simple text control, enter a Title and a Tag and check the box to prevent the control being deleted
- To populate the control with items for the user to choose from, click the Add button to display another dialogue box

- Enter a name to display (the value will automatically display the same, unless you want to change it).
- Click the OK button or press the Enter key on the keyboard to add this item to the list of items to choose from.
- Click the Add button or press the Enter key on the keyboard to add another item
- Once all the items have been added click on the OK button.
- Click on the button to display the Legacy tools
- Click on the options button option
- Click on Properties
- Enter information about name, Caption and Group


Option Buttons
To enter options buttons:

Note: Only one option button within a particular group may be selected at any one time. So the Male option button is also a member of the GroupName = Sex

The rest of the fields can be completed in a similar fashion.
Finally, click the Design Mode button to come out of design mode.

Protecting the form
In order to restrict users to only being able to fill in forms we need to protect the document and restrict editing.
To protect the form:
- On the Developer tab, in the Protect group, click on the Restrict Editing button

- This will open a tool pane down the right hand side of the screen.
- Under the second heading “Editing Restrictions”, select the box and then select “Filling in forms” from the drop down box.

- Under the third heading “Start Enforcement”, click on the button “Yes, start Enforcing Protection”.

- This will open another dialogue box. Enter and confirm a password and click OK


The form is now protected and can be distributed for users to fill in.
The next post will cover how to extract data from a number of forms.
Using VBA To Check Task and Assignment Fields
I’m currently working on a project to create a macro for MS Project. The intention is that this macro will fire either on Save or on the click of a button and will check to see if certain fields have been filled out for tasks and assignments. Any missing fields will be reported back to the user.
We use Project Server to generate a “Daily Log” where we can record work against tasks that have been assigned to us. In order to make the completion of the daily log as easy as possible for the end users and for the plan owner (not to mention our finance department), we want to be able to check that most of the required information is in place in the first place.
Task fields
It is relatively easy to loop through tasks and check for task level fields.
The easiest thing to do is to work with all the tasks in the current collection of tasks in the active project.
First we need to check that the task is actually a valid task (i.e. not a blank row) and that it is not a summary task.
Then we can populate a number of variables with the required values.
Dim ts As Tasks
Dim t As Task
Set ts = ActiveProject.Tasks
Dim tCPSScope As String     ' Task field In CPS Scope
Dim tAtCPS As String        ' Task field At CPS
Dim tTaskCat As String      ' Task field  Task Category
Dim tBillCat As String      ' Task field  Billing Category

For Each t In ts
    If Not t Is Nothing Then
        If Not t.Summary Then
            ' Check task level fields
            tCPSScope = t.GetField(FieldNameToFieldConstant("In CPS Scope"))
            tAtCPS = t.GetField(FieldNameToFieldConstant("At CPS"))
            tTaskCat = t.GetField(FieldNameToFieldConstant("Task Category"))
            tBillCat = t.GetField(FieldNameToFieldConstant("CPS Billing Category"))
Here we can see that VBA has a way for us to get the value of task fields.
Assignment Fields
Reading assignment level custom field values is a bit more tricky. If the name of the custom field is one word (i.e. there are no spaces), then according to various other web sites I have looked at, for an assignment a; “a.fieldname” will do the trick. Unfortunately, if the field name does contain spaces then this method will not work.
Since I was unable to resolve the issue by working in the background I decided I had to work in the foreground (i.e. by working with a view).
To make sure that I covered all the task and could work with all the required fields I wanted to do the following:
- Use a Enterprise view
- Remove any filters
- Display all tasks
This can be achieved using the following code:
'Switch to CPS Timesheet view
ViewApplyEx Name:="CPS Timesheet", ApplyTo:=0
TableApply Name:="CPS Timesheet"
' Remove Filters
FilterApply Name:="&All Tasks"
'Expand to show all tasks
OutlineShowAllTasks
We can now loop through all the rows in the view. This is one area where I have used a bit of a hack. I haven’t found an easy way to count the number of used rows in the current view. However, I can count the number of tasks in the current project and I know that we rarely assign more than one person to a task, so the following should give me a high enough limit to count to.
tCount = ActiveProject.Tasks.Count
tCount = tCount * 2 ' Assume no more than 2 assignments on each task

' Loop through all rows
For r = 1 To tCount
The view I’m using is a Task Usage view and therefore contains the names of tasks as well as the resources assigned to those tasks. What I need to do is to differentiate between Tasks and Assignments.
Now I can use the SelectTaskField to select a specific cell in row r and column specified by a field name.
SelectTaskField Row:=r, Column:="Name", RowRelative:=False
SelectTaskField
A couple of important points about this command:
- Column – this should be the real name of the column as stored in Project, not the name shown in the view. Hence the use of Column:=”Name”, rather than Column:=”Task Name”
- RowRelative – the default value for this is True and will therefore select a cell r rows down from the currently active cell. Therefore, this should be set to False to ensure that it is always row r that is used.
Having selected the cell in the “Name” column of row r we can read the text in the cell using:
sTest1 = ActiveCell.Text ' Read the text in the Task Name column
Task.Name
It is also possible to query the name of the task associated with the currently active cell.
sTest2 = ActiveCell.Task.Name ' For the current cell get the associated task name
And we can therefore compare sTest1 with sTest2. If they are the same then we are looking at a Task. However, if they are different then we are looking at a resource assigned to a task and the current row is an assignment. We can therefore pick up cell values from other columns in the row and compare them to expected values.
Final Outline
So, the final outline of the code looks like this:
Sub CheckAssignmentsBlogEx()
Dim r As Long    ' Row counter
Dim sTest1 As String ' String to test - taken from Name column
Dim sTest2 As String ' String taken from task name - compare to string 1
Dim iTID As Integer     ' Task ID
Dim FRS As String   ' Report String

' Project Server Custom Fields to test as Assignment level
Dim TBC As String, Billable As String, REx As String, RCR As String
Dim tCount As Integer   ' Count the number of tasks in the project

tCount = ActiveProject.Tasks.Count
tCount = tCount * 2 ' Assume no more than 2 assignments on each task

' Loop through all rows
For r = 1 To tCount
    SelectTaskField Row:=r, Column:="Name", RowRelative:=False
    ' RowRelative is false to ensure the code selects row number r, not r rows below the current one
    sTest1 = ActiveCell.Text ' Read the text in the Task Name column

    If sTest1 <> "" Then ' Only proceed if the cell contains some text (i.e. is not blank)
        ' Get the task ID for the selected cell - used for comparing assignments to tasks and creating final report
        iTID = ActiveCell.Task.ID
        If Not ActiveProject.Tasks(iTID).Summary Then   ' Check that the current task is not a summary task
            sTest2 = ActiveCell.Task.Name               ' For the current cell get the associated task name
            If sTest2 = sTest1 Then
                ' the task name is the same as value in the name column. Therefore,
                ' this is not an assignment
                    ' Do what we need to do with task level information
            Else
                ' the two strings are different and therefore,
                ' this is an assignment
                    ' Do what we need to do with assignment level information
            End If
        End If
    End If
Next r


End Sub
More on slide libraries
Some further thoughts on the use of SharePoint Slide libraries, following my earlier post.
-
Ownership
It is important that there is ownership of a slide library, otherwise members of the team will upload all of their own slides, resulting in duplicates and lots of similar slides. Further, amendments to existing slides should be approved by some defined process.
It is possible to grant permissions on a slide by slide basis, but this is very cumbersome and time consuming, especially for large libraries.
Perhaps a better solution is to have several libraries. So there would be a Marketing library for slides about the company as a whole, a Consulting library for slides relating to the consulting process and a Training library for slides that provide information about the training courses.
In this way there can be different owners for each slide library, for example someone from Marketing, someone from the Consulting team and someone from the Training team. This would then enable each set of slides to be managed by one person and consumed by many different people across the organisation. For example sales, recruitment, training as well as consulting will all want to use the marketing slides.
-
Combining slides from different libraries
Slides from different libraries may be combined into one PowerPoint presentation.
Select slides from Consulting slide library and add them to presentation

SharePoint Slide Libraries
At a recent meeting of all the consultants, we were talking about the various tools that we use and how we use them. These can include various PowerPoint presentations. One of the more senior people in the room asked; “Wouldn’t it be great if we could have one central repository of all the PowerPoint slides that might want to use? It would be even better if we were told automatically when these slides are updated and we can be sure that we are using the most up to date slides in our presentation.”
I thought about this for a brief moment and then said “That sounds like SharePoint slide library to me. I’m pretty sure you can do all those things from a slide library”.
And, as it turns out, you can.
Adding slides to the library
To add one more slides from a presentation to the slide library:
- From within PowerPoint, right click on any slide to display the context men.
- Click on the Publish Slides option

Publish slides
- This will open the Publish Slides dialogue box. The slide that was right clicked on in the previous step will already be selected. Use the checkboxes to the left of the thumbnails to select other slides. Alternatively use the Select All button to select all the slides.

Select files to publish
-
Use the Browse button to locate the slide library:
- Clicking on the Browse button will open the “Select a slide library” dialogue box

Browse to locate the slide library
- Enter the address of the slide library in the address bar. Alternatively enter a top level address such as http://cps.co.uk and then navigate to the required slide library
- Click the Select button
- Clicking on the Browse button will open the “Select a slide library” dialogue box
- Once the required slide library has been selected, click on the Publish button
- The required slides will be added to the slide library


Using slides from a slide library in a presentation
To add slides from a slide library to a presentation:
- Open the slide library that contains the required slides.
- Use the check boxes to the left of the slide thumbnails to select the required slides
- Click on the link to copy the required slides to a presentation

Select files and Copy slides to presentation
- If PowerPoint is not already open then it will be opened a dialogue box will prompt you to add the selected slides to a new presentation

Copy slides to PowerPoint
- If there is already a presentation open then there will be the option to add the selected slides to a new presentation or the existing one.

- In either case the second check box should be selected. The next time the presentation is opened a dialogue box will appear, prompting the user to check for changes.
- Clicking on the Check button will compare slides in the current presentation to slides in the slide library. If PowerPoint detects that the latter have been changed then a dialogue box will appear giving the user the chance to updates slides in the presentation.
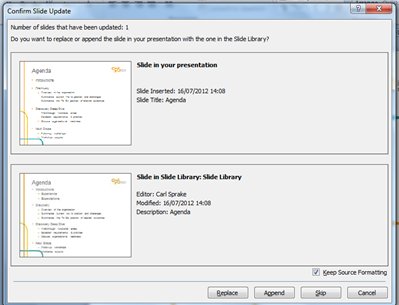


Et Voila! One central repository for slides and notification of changes!
A Wee Trip Part 3 – Glen Nevis
The previous two posts covered the start of our Scottish camping holiday in Loch Lomond and Glencoe. The next stage took us up to Glen Nevis. Since it is only a short journey from Glencoe we stopped at Inchree on the way there, to checkout the waterfalls. However, pulling up to the car park we saw some red squirrels in the trees! There was a feeding station with a number of boxes of nuts and the squirrels were picking nuts out the boxes.

Red Squirrel!
There was short walk to some very impressive waterfalls.

Fall
From Inchree we made the short trip to Fort William for some supplies (a new airbed and some pastries for breakfast) and then on to Glen Nevis campsite.
Stob Ban
While the original plan was to climb Ben Nevis we decided (again) to take the more interesting route. We would leave Ben Nevis for another day and instead tackle Stob Ban and Mullach nan Coirean.
We parked at the Lower Falls car park at Achriabhach. The road crosses two streams. Between the two a path follows the stream and another heads up towards Stob Ban, following Allt Coire a Mhusgain. We followed the path as it climbed up the valley, keeping level with the stream. Soon the valley narrowed and the sides got steeper. The main path zig zags higher up the slopes but we stuck closer to the stream and some interesting scrambling up a steep step. The path soon faded out and we headed up hill to rejoin the main path, which we were able to follow to the Bealach.
A right turn and we were soon scrambling up the rocky steps that lead to the summit of Stob Ban. The mist had closed in while we were still low in the valley so we only had fleeting views on the way up.
A quick check of the map, confirmed by a compass bearing, and we headed north off the summit. We descended slightly and then headed down the obvious path before contouring round, across the boulder field, rathe than following the ridge all the way to the end, which may have been the easier route on reflection.
We followed the ridge round to Mullach nan Coirean, the second Munro summit of the day.
The route back to the car followed the North East ridge, a rocky descent with a few scree sections before reaching a more gentle, and boggy, grassy slope. Across a ladder stile into an old forest, with a new path, and then into a felled section of forest to reach the forestry track and then a path through the wood, alongside a stream with more waterfalls.
And so back to the car.
All the photos are here.
Rest day – Sgurr Choinich Beag
After a fairly epic day up Stob Ban D wanted a bit of a break, because her achilles tendon was sore, but I was keen to tackle another mountain,so we decided to go our separate ways. D headed up Cow Hill behind the camp site, while I decided to attempt another Munro Sgurr Choinich Beag. This time I drove to the car park at the head of Glen Nevis.
From here there is a stunning walk through some woods as you follow the stream up through a narrow gorge, to emerge in a stunning meadow, with Steall falls pouring down the hill side. However, my path took me onwards, along the meadow to the bridge by Steall ruins. I noticed with interest that the bridge had been built by the RE Troop of Oxford UOTC in 19?? – the last two numbers having worn away. Given that I was in the signals troop from 1987 to 1991 I may have known some of those that had build the bridge. In many respects a solitary touching moment as I stood on the bridge and wondered where they were now, and what they had been doing since they had been here to build the bridge.
My destination took me onward, further up the water of Glen Nevis, past the foot of Sgurr a Bhuic and on towards Sgurr Choinnic Beach. My objective was Sgurr Choinich Beag, but first I had to get to the top of Sgurr Choinnich Beach.
Coming through the woods from the car park the weather had looked really promising. There was even some blue sky and sunshine. However, since getting to the meadow by Steall falls the weather had started to close in, and as I followed the stream upwards the mist came down again. I left the stream behind and the ground got steadily steeper. My Mountain Equipment Arrow soft shell had been performing well, but with strong winds blowing the rain sideways I decided to get out the waterproof.
I used the break to take stock of my situation. I was on a steep hillside, by myself, in pouring rain, strong wind and low cloud. Although D knew my route it would be some time before I was missed. We had agreed that I would be back by 7pm at the latest. Some questions formed in my mind:
“Can I get to the top of this hill and the summit of Sgurr Choinnich Mor?” – Yes, probably
“Do I want to battle on through wind and rain?” – No
“Am I enjoying myself at the moment?” – No
“What do I want to do?” – Get out of this rain and cloud so I can see where I am going
So, I decided my best and preferred option was to abandon the attempt and retrace my steps.
It was wet and slippery making my way back down through the heather but I made it back to the path and was back to the car park approximately 5 and a quarter hours after leaving it.
QMDs – 1 (hopefully). Munros – 0
At least I made it back to the camp site in time for a shower and dinner.
The photies (such that they are) are here.
Epic day on the Aonachs
We had originally planned to leave Glen Nevis today and head in land slightly to tackle Ben Lawers or Schiehallion on our way to Dundee. However, with the weather forecast for the next couple of days looking bleak and this day looking like the best of a bad bunch we decided to stay in Glen Nevis.
Having decided against doing Ben Nevis we wanted a decent walk to do. The ring of Steall was out since it seemed too far for us to do in a day and I don’t think either of us were that keen to cross the wire bridge. So we decided on the Aonachs. The plan was simple; from the upper car park walk up to the ruins at Steall then follow Allt Coire Nan Laogh to the South West ridge of Aonach Beag down to the Bealach and up to Aonach Mor, back down to the bealach at 820m then back down Coire Giubhsachan to Steall ruins.
The plan went well until we reached Steall ruins. We could not find a spot where D felt comfortable crossing the right hand tributary of Allt Coire Nan Laogh. So we followed this and headed for Sgurr a Bhuic instead. Maybe we should have gone straight up the ridge but we followed a path instead. The path started to contour round to the East but then petered out, leaving us on a steep heather clad hill side. We had two options really. We could continue to contour round to where the slope looked like it got easier, or we could go straight up to a small gully next to some rocks. The latter option would be a steeper ascent, but we decided it would be easier than continuing to contour around the mountain.
It may well have been the easier option but it was still jolly hard work. I would set myself a goal, some twenty or thirty meters up, scramble up as quickly as I could, digging my fingers into the heather and often digging small steps with my boots. When I reached my objective I would stop, rest, take in the scenery for a short while before beginning again.
In this manner we eventually made it to the relatively flat ground at the base of Sgurr a Bhuic. Again we were at cloudbase so as we ventured up the rocky ridge the mist closed in around us and visibility gradually dropped. Luckily there was a path of sorts but it got pretty close to the edge of the sheer drop for me at times.
Eventually we made it the top, a summit marked by a small cairn with sheer drops around most of it and a steep rocky path descending to the North.
We took this path and soon came to a bealach, from where we ascended again, once more following close to the edge until we reached the summit of Stob Coire Bhealaich. Around this area the path was very narrow. There was a vertical drop to our right hand side and the ground to our left dropped off quite steeply as well. However, it was around here that we encountered two french lads having a break for lunch, sheltering from the wind in their little pop up festival tent.
Having checked they were OK we left them to their lunch and we pressed on. Again maybe we should have followed our noses and continued up the ridge, straight to the summit of Aonach Beag. Instead we continued to follow the path and contoured round to the west, before picking up the west ridge and following that to the summit.
From the summit of Aonach Beag the path led down a fairly short but steep rocky section before the path picked up again and led us straight to the summit cairn of Aonach Mor. By this time the wind had picked up a fair bit, the rain was coming down and the cloud made visibility very limited – no more than 25meters in some places. We used the GPS to plot our position on the way to the summit and I correctly calculated that we were 150meters away.
Coming off the summit we were looking for a ridge to the west of the summit path, that leads down to a bealach at 820m. The guide book has said “Careful navigation is required to find this path, especially in poor conditions”. Well they couldn’t have been much poorer. I used the compass romer to estimate that we needed to come 600m down from the summit. So we both paced 600 meters, for the first time I used the toggles attached to my compass string to count off the hundreds of meters. A check with the GPS showed that we still needed to come down another 100m. So we paced out another 100m before checking with the GPS again. Having confirmed our position the map suggested that the ridge we were looking for was 200m away on a bearing. So I set off across the hillside following the bearing. After about 150m a cairn became visible through the mist. Heading for the cairn we found that it marked the path down to the bealach – we had made it.
The path down was treacherous. Very steep, with loose soil and rocks it seemed to take forever, but eventually we were back on flat ground again, looking toward Allt Daim to our right and Allt Coire Ghiuthsachan to our left. Turning left we followed the stream across the hanging valley, crossing mud and bogs along the way, before dropping back down into the main Glen Nevis valley and down the steep heather slopes to the ruins at Steall.
From there it was an easy, but tiring walk back to the car.
A truly epic day (for us), 10 hours 45mins in the mountains. Definitely a QMD and two munros.
Photies here.
The rest of the holiday
Following our epic adventure on the Aonachs we had a rest day just chilling out around Glen Nevis.
The day after we drove across to Dundee. We passed through Glen Spean and Inverroy, from where we had a view of the ridges of Aonach Beag and Aonach Mor, a brief journey through the glorious Cairngorms national park and then on to Perth and finally Dundee.
We had a great day on Friday, meeting D’s friends, before heading home Saturday. The torrential rain and cloud around Edinburgh and Glasgow gradually giving way to drier finer conditions as we drove south.
A Wee Trip Part 2 – Glencoe
The previous post covered our first two mountains in Scotland, Ben Lomond and Beinn Narnain. After two days in Loch Lomond we moved on to..
Glencoe
I had been looking forward to Glencoe, and an opportunity to tackle classics such as Buachille Etive Mor and Bideam nam Bean. Unfortunately the weather forecast for the next couple of days was not very encouraging. Low cloud, rain and strong, gusting winds, especially on exposed ridges. So maybe those two classics will have to wait for another day.
Instead we decided on a “low” level walk up Beinn na Caillich, from Kinlochleven.
We parked in a layby by the side of the road just outside Kinlochleven, on the North side of the Loch. Walking along the road for about 200m we soon found a stalkers path that led us up through the woods to join the West Highland Way. We followed the West Highland Way for about 1km Westwards before descending into the valley to cross a stream.

Crossing the stream
Once across the bridge we then ascended the East ridge of Beinn na Caillich via a number of zig zags. I’m always amazed at the plant life that manages to cling to the wet and rocky surfaces, as well as surviving the impact of walkers’ boots. One of the most interesting type of plants are the carnivorous plants, such as the Butterwort and the Sundew.

Sun dew
We crossed a relatively flat plateau before the final steep set of zig zags and the final pull to the top. Simply crossing this plateau I was amazed at the plant life, including the various types of lichen:

Purple Lichen

- Rhizocarpon sp with fruiting bodies

- Cladonia sp

The summit was in cloud (seems to be a common theme for us), with very high winds on ridge. Descended West ridge to Bealach then into Fraoch Choire and headed North back to pick up the West Highland Way to retrace path to car.
As we walked to and fro along the West Highland Way we passed through a gate across the track. The gate was not locked so we were able to open it, walk through and close it after us. To one side of the gate was a normal stile. To the other was the structure shown below. We have no idea what it is for.

What is this?
Time: 6.25 hours, so another QMD but no Munro.
Back at the camp site the sun came out, providing some stunning views of the surrounding mountains.

View from the camp site
As usual, all the photos are on Flickr.
A Wee Trip to Bonnie Scotland
“You can’t consider yourself a true Mountain God unless you have done some Scottish mountains”. This, or something like it was the pronouncement from the main instructor of my ML course at Plas-y-Brenin last year. There was also the advice to ensure that the Quality Mountain Days (QMDs) that we gathered before the assessment were from a selection of mountain regions, not just North Wales.
With these two edicts in mind and with D wanting to catch up with some of her friends from Dundee we decided our two week holiday this year would be to Scotland. I had originally planned to go up mid week, but since I am such a keen and dedicated worker I moved my holiday so that the client I was working with got the most time from me. So the plan for our two weeks looked something like this:
| Saturday | Home prep and pack |
| Sunday | Drive up to Loch Lomond |
| Monday | Ben Lomond |
| Tuesday | Another mountain |
| Wednesday | Drive to Glencoe |
| Thursday | Mountain in Glencoe |
| Friday | Mountain in Glencoe |
| Saturday | Drive to Glen Nevis |
| Sunday | Ben Nevis |
| Monday | Ring of Steall |
| Tuesday | Flexible – Schiehallion? |
| Wednesday | Flexible – Ben Lawers? |
| Thursday | Drive to Dundee |
| Friday | Dundee |
| Saturday | Drive home |
| Sunday | Home in Oxford to unpack |
So, we joined the Camping and Caravan Club (to get good deals on a couple of campsites), booked campsites at Loch Lomond, Glencoe and Glen Nevis and booked into a hotel in Dundee. The Flexible days in between we decided to wait to see how things went.
Loch Lomond
The drive up on Sunday went well. Good weather and no traffic problems, so at around the predicted 6pm we found ourselves arriving at the Milarrochy Bay campsite on the eastern shores of Loch Lomond. We pitched our tent on a lovely spot overlooking the Loch and all was well with the world as we set up camp. We were even visited by a fox, who had a good peer into the tent and I am sure would have investigated further had I not been in the tent.

There was even a pub in Balmaha which we could reach by a footpath than ran along the shores of Loch Lomond from the campsite.
Ben Lomond
The next morning we drove up to the Forestry Commission car park at Rowaredennan and set off to tackle Ben Lomond.
We seem to have a knack for finding the more interesting / challenging routes up mountains. In this case we set off up the West Highland Way until we got to Tom Beithe, where we headed up the narrow path that led steeply up the hill side towards Ptarmigan.
From Ptarmigan we had a great view of Loch Lomond and the surrounding mountains, including our objective for the next day: Beinn Narnain.
We even got to see three Ptarmigan – on the top of Ptarmigan.

The View back down the Ptarmigan path
From the top of Ptarmigan it was an easy scramble to the summit of Ben Lomond, from where the views were amazing. We would have stayed longer but there were hordes of midges up there. Swarms of the little blighters. So it was a photo of me, a photo of D then we were looking for the way down.
The tourist path is easy to follow and a good route to take down. Taking it up would have been a monotonous slog though.
Anyway, we made it back OK. My first Scottish QMD and my second Munro (I did Ben Nevis the year before last as part of the 3 peaks challenge).
Another pleasant walk to dinner at Balmaha and early to bed.
All the pictures can be found on my Flickr site.
Beinn Narnain and The Cobbler
The next day dawned bright and sunny. After breakfast we packed our gear into the car and drove round to the other side of Loch Lomond and up to Tarbet, where we turned off the A82 and drove the couple of miles to Arrochar, parking in the car park at the head of Loch Long.
From the car park we picked up the forest track that zig zags up to the dam. In accordance with our knack to find the more interesting routes up mountains, we ignored the main path that headed up the valley, but took the faint path that contours to the North East and meets the path that ascends straight up from the road near the foot of Creag an Fhithich. From where the paths meet we climbed straight up through the heather to eventually pick up the track that runs along the ridge towards Cruach nam Miseag.
We followed the obvious path, scrambling up the steep rocky slopes of “The Spearhead” to reach the summit of Bein Narnain. The weather had been deteriorating and as we reached the summit it started to rain. On the summit we met a couple of lads, one of whom was celebrating his 30th birthday.

We followed the summit ridge and then descended to the North West before turning South West towards the Lochan a Chlaidheimh.
From the Lochan it was a relatively simple ascent up a decent set of steps towards the summit of Ben Arthur (the Cobbler). In order to actually stand on the summit some precarious scrambling is needed as you “thread the needle”. I wasn’t sure I was up to the task on a good day. When we got there and the mist closed in, reducing visibility to a few yards, the rain came down and the wind picked up I knew I definitely wasn’t going to attempt it.

Me, close to the summit of the Cobbler. Just to remind you of the date: June 26 2012.
So, we retraced our steps to the Lochan and followed the long valley path back to the zig zags through the forest and ultimately back to the car. Total time: 7.5 hours.
Another Scottish QMD and another Munro.
All photos are on my Flickr site.
At this rate I think I better create additional posts for the rest of the holiday.
